
Table of Contents
Are you starting to work with SMS API? Read the developer guide, and let us walk you through five simple steps towards your first SMS message sent via API.
Our brand name, SMSAPI, carries a long history, as it’s 16 years old. The funny thing is, it was coined by our founders, who were developers themselves. They wanted to emphasise that the platform they created was designed especially for IT people.
Fast forward to today: We also have a web-based version next to our exceptionally stable, reliable API. Its iconic blue colour is a trademark of our brand. The Customer Portal is used by people not proficient in programming every day. Most of them are not even aware of the meaning of the second part of our name – they want to send and receive SMS messages.
Global SMS messaging made easy with SMSAPI
Still, our SMS gateway API is constantly upgraded, modernised and expanded. It’s a cornerstone of many of our internal products. More importantly, it’s actively used by our clients like iQueue, Insly and ProTrainUp. We want to help companies that need an effective, quick and reliable communication solution to start using API. Oh, and naturally, we send messages globally – read about SMS API global reach (link below).
I’m fully aware that the decision “Let’s pick SMSAPI and their SMS gateway API to send text messages” was probably made by some other department (if your company has such structure) or even more spontaneously (“whoa, this API looks good and has neat documentation”). After all, the developer will have to fire up their IDE, make coffee and dig through it all.
Send text messages using PHP
This series is meant for all struggling with the first steps. I’ll show you how to use our reliable SMS API. Start by pinpointing the most essential and fundamental things you must do: send your first SMS via API using PHP. There’s even a separete guide on how to do it:
API SMS sender guide starts here!
Step 1: Create and verify a SMSAPI account
Needless to say, it’s the first and most crucial step to start your work – creating an account. Watch a quick screencast to see how to set up an SMS messaging service yourself quickly using SMS APIs to enhance communication.

Test SMSAPI
Create a free account at SMSAPI and test the professional SMS gateway for companies.
I highly recommend that you right away turn the two-factor authentication (2FA SMS) on. And as always, use a unique, long and strong password. Stay safe.
Registration and verification at SMSAPI
Of course, if you already have an account to work on, you can skip forward or create a sub-user for yourself. Don’t forget to charge it, to have some points for testing and SMS messaging.
Step 2: Add company name to SMS message (SMS sender name)
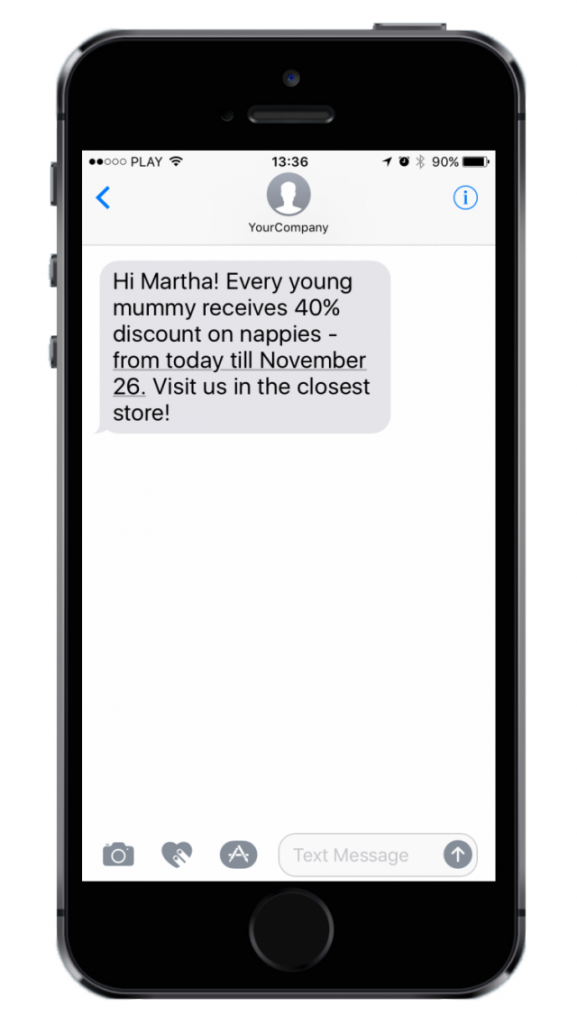
SMS sender name is a text shown as a text sender on the recipient’s phone. It looks like the picture to the right.
It’s sometimes called SMS branding or branded SMS. Nevertheless, it can have up to 11 characters and should represent the brand that sent the message. So pick a name that will be easily recognisable as a part of your company’s communication.
This might be important: if you want to send and receive SMS, you won’t be able to use the sender ID. You either use a 2-Way long or short code or send a text message with a brand. There’s no way around it. Toll free numbers can also be used for branded communication, facilitating SMS and voice calls, and allowing you to send and receive messages in the US and Canada.
All messages sent from a new SMSAPI account are default branded as “Test,” which is sufficient for tests. But if you’d like to work with your name, you must complete the registration and activation process. You can do set your alphanumeric sender ID in the SMSAPI Customer Portal, and it’s pretty easy. Watch the how-to video below.
How to send bulk SMS with comapny name?
Step 3: Use a library or SMS API to send SMS messages
It’s the first important choice that you must make. On the one hand, there are SMS API Libraries created by SMSAPI. They are available in a few popular languages, and you can download them from GitHub. The SMS API is also a critical tool for automation workflows, offering features like message queuing, advanced metrics, and integration with automation tools.
On the other, you can connect directly with SMS APIs without any library. The process has been thoroughly described with examples in our Documentation in the form of OpenAPI using the popular Swagger tool.
The choice is entirely up to you, your preferences and your goals. All libraries will allow you to send text messages to work with our contacts database. At the same time, not all of them support virtual mobile numbers.These special numbers allow you to send and receive SMS messages from your customers. We’ll get into it in one of the next episodes.

How to receive SMS online using API SMS?
If you are looking for quick and easy integration, we recommend using one of the ready-made libraries, assuming you are developing in one of the available languages. It’d make your work easier and faster.
But! If you’re planning on doing something more advanced than tools provided by a library allow, or if you prefer not using Fluent API (by the example of JS library) and would like to have greater control over the integration, you should know that connecting with an SMS API directly is an equally viable choice.
Read more about SMS API for developers integration
Step 4: Generate authorisation key
Log in to the Customer Portal, and go to the section API tokens to generate API key.

Next, click the “Generate access token” button. A window will be displayed where you can limit the token’s access to fit your needs. Having data access minimalisation and security in mind, selecting text messaging (SMS) will be enough – you can toggle off the rest. Message scheduling is a crucial feature that enhances communication objectives.

When finished, click “Generate token”, and then you’ll see a new pop-up with your freshly generated API verification token.
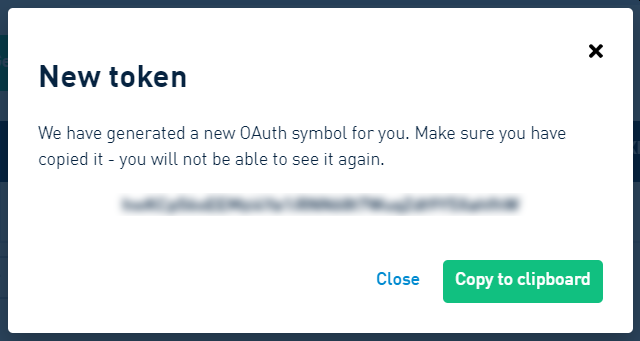
Attention
Due to security concerns, we will never show you your complete token ever again. So, it’s best to paste it into the code immediately (or, even better, directly into the configuration). If you close the pop-up before copying it, you’ll have to generate a new token.
Step 5: Test API request – sending SMS
All that’s left is actually to send your first text messages via SMSAPI’s API! To do it, use the code below. In case of any problems, our Documentation is there to help you. The API also supports sending bulk SMS, allowing you to send a high volume of messages with a single request.
<?php

/** URL address of SMSAPI API, @see https://www.smsapi.com/docs/#url-adresses */

$smsApiUrl = 'https://api.smsapi.com';

/** OAuth autorization token, @see https://ssl.smsapi.com/react/oauth/manage */

$smsApiToken = 'token_oauth';

/** sender name, @see https://ssl.smsapi.com/sms_settings/sendernames */

$from = 'test';

/** recipient list, separated by comma */

$to = 'XXXXXXXXX';

/** message body */

$message = 'Hello world!';

/** answer format */

$format = 'json';

$httpClient = curl_init();

curl_setopt($httpClient, CURLOPT_URL, $smsApiUrl . '/sms.do');

curl_setopt($httpClient, CURLOPT_POST, true);

curl_setopt($httpClient, CURLOPT_POSTFIELDS, [

    'to' => $to,

    'from' => $from,

    'message' => $message,

    'format' => $format,

]);

curl_setopt($httpClient, CURLOPT_RETURNTRANSFER, true);

curl_setopt($httpClient, CURLOPT_HTTPHEADER, [

    'Authorization: Bearer ' . $smsApiToken

]);

$apiResponse = curl_exec($httpClient);

curl_close($httpClient);

echo $apiResponse . PHP_EOL;

?>
This single API request will send your first message to the selected recipient numbers. It’s probably best to change the number to yours to actually receive the text. Do it in the $to variable. Oh, and you need to paste your OAuth token into the $smsApiToken variable.
You need to pay extra attention to the recipient number in the $to variable. It must be preceded by a country code, just like “44123456789” – “44” is a country code, and “123456789” is a sample phone number. We are an international company, so we need the code to know which country the message is supposed to reach.
All that’s left is running the code in the PHP interpreter. Do it by saving the code as a testSms.php file on your computer with a PHP interpreter present. All versions >= 5.4 should run the script just fine with the command (you might need to adjust the command to your specific environment if you don’t have PHP in your $PATH or your PHP executable is named differently):
php testSms.phpIf everything went smoothly, you should get a success notification in JSON format looking like this one:
{"count":1,"list":[{"id":"566275XXXXX","points":0.14,"number":"48XXXXXXXXX","date_sent":1603356627,"submitted_number":"XXXXXXXXX","status":"QUEUE","error":null,"idx":null,"parts":1}]}And after a while (depending on you carrier network), you should receive an SMS on your phone!
SMS sending API: most common errors
What if the test was not concluded with success? Our SMS API will provide you with an error code to help you identify the reason for message delivery failure. All errors or explained in the Documentation. The most common are:
- Error 101, Invalid authorisation info – invalid token or server connection data, e.g. to api.com.pl instead of api.smsapi.com.
- Error 14, Wrong sender – wrong or inactive SMS sender ID; check sender names in the Customer Portal.
- Error 11, The message is too long, or there is no message or parameter: nounicode is set, and special characters (including Polish characters) are used – you are trying to send a message longer than your limit set in the account configuration – remember that message with characters outside of Unicode has a lower character limit. As usual, you’ll find more information in the Documentation.
- Error 13, Lack of valid phone numbers (invalid or blacklisted numbers) – delivery failed due to the inactive or blocked numbers; check whether the entered numbers are valid and if there are no extra characters.
- Error 103, Insufficient credits – not enough points on the account or subaccount.
A couple of errors are not shown by SMS API error notification (and they won’t be present in logs). It is because they occurred before the connection with our SMS services could be established. The most common are:
- Connection to a wrong address – correct address can be found in our Documentation, but you’ll probably want to use https://api.smsapi.com/.
- Connection using TLS protocol version lower than 1.2 – we do not support older versions of TLS protocol because they are depreciated as not secure enough. You have to check the TLS version of your system (environment) and probably update your entire environment or its part.
- Connection blocked by a firewall at the client’s side means that connection had been blocked somewhere between your machine and our API; you have to check your system or talk to the network administrator. The problems rarely occur on developers’ computers (if so, you wouldn’t even be able to read this article!), but it’s a possible scenario in isolated networks operating in server centres. Whitelisting IPs of SMSAPI servers should solve the problem.
One more thing can prevent you from getting that SMS on your phone. Some sender names are blocked in certain countries. Unfortunately, our default sender SMS name, “Test”, is also blocked in some regions, like the UK.
Many local restrictions (imposed by a country or even a carrier!) regulate SMS sender IDs. That is why we need to work case-by-case, usually filling out some paperwork if we want to use brand-specific sender names. So if you struggle with receiving SMS despite API giving you a success message, contact our support specialist for more info and assistance.
SMS API ready! What’s next?
Our free API has a lot of applications. You can send and receive SMS messages, manage contacts stored on your SMSAPI platform, add parameters to bodies of messages or change settings. Moreover, it allows you to use the callback feature required when receiving messages from your customers.
SMS marketing is another powerful use case, enabling businesses to enhance communication with customers through bulk messaging, real-time engagement, multimedia content integration, and detailed analytics. Gain competitive edge with global SMS marketing campaigns!
SMS service integrated with e-commerce platform will powerup your customer support. Set automated SMS notifactions and inform about payments, shipping and other important step of customer journey.
So, stay tuned. I’ll explain everything step-by-step in the upcoming episodes!


