
Table of Contents
How to configure two way SMS service using API? No sweat! Here’s the 2-way messaging explained in five simple steps.
In the previous article from the Developer Guide series, I discussed a method to send SMS online from the SMSAPI. Now I’d like to address the reverse issue: how to use an IT system to receive SMS messages sent by the customer?
It’s the second part of the SMSAPI Developer’s Guide. If you’re looking for more basic knowledge, read the introduction to using the API to send SMS campaigns. As per the usual, please refer to our Documentation, linked below, in case of any troubles.
We expect companies to interact with us, not just to provide information
This need has existed forever, but it is only recently that popular technologies have gained the capacity to meet it. The tool that first comes to mind when you think of such interaction is probably Facebook Messenger. WhatsApp was the next, granting its partners (and consequently companies) access to its business API, and sooner or later, other messaging apps popular in different parts of the world (such as Viber or Telegram) followed.
A programming interface allows us to converse with the user. Imagine a situation like this: a customer chats with a company on WhatsApp. A customer service employee replies through several intermediate systems, plugins, and customer service platforms.
Two things are beautiful here: the fact that the customers are using an app they are familiar with and one they have installed on their phones. Both make life easier for the CS department. Here too, the person is chatting using a familiar interface. The simple process streamlines question handling, ensures order, and improves customer experience.

Conversational Messaging – a definition
Conversational Messaging means a one-on-one interaction between the customer and the company via various communication channels. A customer service employee, a bot, or pre-set script can answer questions.
Get to the point. Where’s that SMS reception?
SMSAPI provides tools to implement two way SMS communication the easy way. In short, you’ll be able to talk to your audience about things, and they will be able to reply. Inbound messages from customers have a multitude of business applications: they can help you to build relationships, clarify essential details, remind and manage appointments, survey satisfaction, boost customer engagement or simply communicate with your audience.
An excellent example is the Surveys and Voting module, which uses two-way SMS communication to conduct questionnaires of all kinds. You can often encounter them on TV or the radio. Some government is perfectly aware of the advantages of two-way SMS too, using them, for example, to run registration for COVID vaccinations.

How to start with 2-way SMS messaging?
Before you start with your 2-way SMS campaign, talk to your SMSAPI consultant. We’ll check the availability and legal requirements in your desired destination. Find the contact details in the lower left corner of the Customer Portal.
In one of my previous articles, I discussed measuring the NPS index. SMS surveys are an excellent tool for investigating customer satisfaction. The capabilities and simplicity of this solution never cease to amaze me (and neither does the result, but I suppose I shouldn’t keep bringing that up, so I won’t…).
Many brands are using Two Way SMS campaigns to engage customers. Meaningful conversations, witty outdoor campaigns, and even simple SMS contests are all viable options here. And that’s the cool thing about business SMS messaging: it tests your ingenuity on how to use instant responses and turn them for your gain. It might include customer service, sales or brand awareness. Go boldly!
Receiving SMS – configuration
SMS gateway provides the ability to receive SMS messages using the callback mechanism. As a first step, ensure that the SMS reaches the number associated with your account (or shared with other accounts using a prefix).
Step 1: Reserve a number to receive SMS messages from clients
The first thing to do is contacting with your Customer Service Department, who will surely suggest the best option for the 2 WAY SMS. Keep in mind that certain regions have local regulations regarding SMS communication. We’ll help you to configure the parameters of the number for receiving SMS. All messages sent by the customers will be available in the Portal.
A side note: you can’t use the sender ID and receive text messages. These two cancel each other out. So you either send branded one-way SMS or receive 2 way SMS.
Step 2: Activate the number to receive messages
Feel free to get yourself a cup of coffee while our Customer Service activates your two-way SMS number.
But keep your phone at hand, as depending on your history and previous activity, it may happen that we will call or e-mail you for additional information. Present your intentions and purpose for receiving SMS. This way, we’ll be able to provide better advice in various matters, for instance, by suggesting a different type of number better suited for your SMS campaign.
Step 3: Prepare a script to handle SMS reception
Finally, some actual programming! But not too much, just enough to be done before breakfast. Begin preparing a script handling information conveyed to SMSAPI after registering a received SMS message.
SMS reception script
Your SMS reception script must meet these conditions:
- publicly available over the internet, or at least from the IP address of the SMSAPI servers,
- able to handle fields from the POST table listed in the Documentation, which will provide information on the details of the incoming SMS,
- registered for handling incoming callbacks in the Customer Potral, but more on this in the next step.
Configuring the webserver and PHP interpreter goes beyond the scope of this article. In my laboratory, I used nginx in a fairly standard configuration with PHP 7.3.
Receiving SMS – a sample PHP script
<?php

$to = $_POST['sms_to'] ?? '';
$from = $_POST['sms_from'] ?? '';
$date = $_POST['sms_date'] ?? '';
$content = $_POST['sms_text'] ?? '';

$logTemplate = "to: %s\n"
    . "from: %s\n"
    . "date: %s\n"
    . "content: %s\n";

$log = sprintf($logTemplate, $to, $from, $date, $content);

$file = fopen('callback-sms.log', 'a+');
fwrite($file, $log);
fwrite($file, str_repeat('-', 32) . PHP_EOL);
fclose($file);

echo 'OK';
This script’s purpose is to interpret the data sent via a callback and to save it to the callback-sms.log file. The first part of the script declares the variables to be displayed later. They are immediately fed with the relevant POST array elements, which will be provided to the script together with the array. Find a complete set of variables you provide with each callback type in the Documentation.
Mind the callback types
Pay particular attention to the subtle differences between the callback types. The array will be of the POST type for a callback with reception, but the table will be a GET type for a callback with a report.
Then you define the format in which you will log the information sent by the callback and assign it to the variables. Next, the $log variable is fed with data to be displayed based on this format.
In the next step, you save the data to a callback-sms.log file and send them as a reply string “OK”, which SMSAPI expects as confirmation. It must be “OK” – sending back http code 200 will not be enough. That’s enough coding for today!
I’ve uploaded the file to a publicly visible server at https://server_address/smsapi/receive.php. Now all that’s left is to configure a callback at the SMSAPI website. Let’s get to work!
Step 4: Configuring the callback
Once you log in to SMSAPI, go to the Callback Addresses view. Here you can configure all the callbacks available in SMSAPI (and there’s a hefty number of them), but now the only thing of interest to you is “2Way SMS”. Select it from the list.
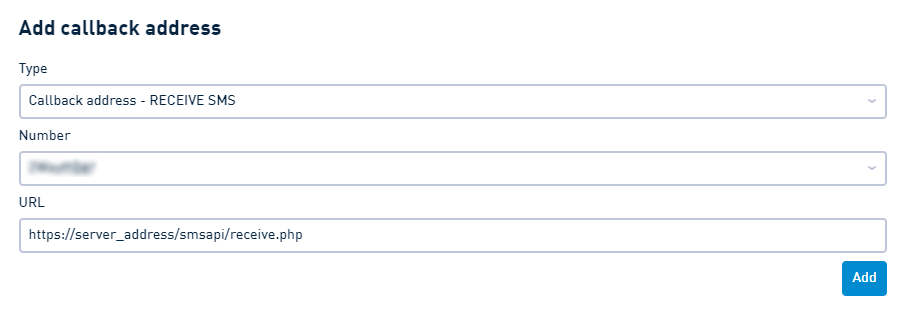
You can configure the callback to activate only when you receive an SMS to a particular number. So pick the number (there can be more on the list – you need to select the one you activated in Step 2) and complete the address under which the script of Step 3 is visible. Click Add and the freshly created configuration will appear on the list.
Step 5: Test it!
Now you can (and in fact, you should) test the connection – check if the callback gets delivered. To do this, click the “Play” icon in the Options column on the right-hand side. In my case, the test was successful, which is confirmed by the blue speech bubble in the top right part of the screen.
However, if something doesn’t work (SMSAPI shows you a short report with the source of the problem), you need to check if your script and URL address are publicly accessible.
Next, make sure the configuration, script and number are functioning correctly. The simplest way to do it is to send a text message from a phone to the number activated in Step 2 while monitoring the callback-sms.log file.
If it is created, it means that the first SMS has appeared. Success! SMSAPI has registered the incoming SMS, and a callback has sent the information to the script. The script has registered and interpreted the information, saving it to the file.
Alright, so something has appeared… What now?
This example is merely an appetizer to entice you to build on. Receiving incoming SMS messages using an IT system opens up numerous possibilities – from building marketing automation processes to using text messages as a support channel in customer service, as we mentioned at the beginning… You could even create an appointment reminder with an automated rescheduling system. The sky is the limit!


